How do your visitors actually interact with your website apart from just browsing its pages?
Where did you acquire the visitors who submitted your contact form?
How many visitors actually scrolled through your landing page’s content?
Google Analytics (GA) is a fantastic tool that digital marketers use to track their website data. However, are they maximising the potential of what GA can offer?
The most common implementation that we see is just the basic installation snippet being placed onto the website. That gives you some basic statistics on the way your visitors browse your pages, but not on their interaction with their content. To do the latter, you need to utilize event tracking.
How does Google Analytics Track Events?
Here’s the general process of event tracking via Google Analytics in 5 steps –
![]()
So how do you create an event on GA?
Disclaimer: We highly recommend using Google Tag Manager so you don’t have to do much programming at all, but only through this will you appreciate that.
Step 1: Insert GA installation code on your webpages
Most of you should already have this done, but for completeness sake, the pre-requisite to event tracking with Google Analytics is having Google Analytics installed on all your web pages. Simply ensure that the Google Analytics installation code is present on all your webpages and it will start tracking your website data.
This is an example of GA installation code:

Step 2: Creating Events with Tags!
To track an event, you will first need to create a tag which is a snippet of code like this:
ga('send', 'event', [eventCategory], [eventAction], [eventLabel], [eventValue], [fieldsObject]);
- Category: name for a group of events
- Action: the action taken by the user
- Label (optional): differentiate this event from other events
- Value (optional): numeric metrics e.g. file size, video length
This line of code sends information about the event to Google Analytics. For example, you want to track the number of times a contact form on a landing page was submitted, you’d use the following values –
- Category: ContactForm
- Action: Submit
- Label (optional): ChristmasCampaign
- Value (optional): 0
Putting that in code, it’ll look like this –
ga('send', 'event', 'ContactForm', 'Submit', 'ChristmasCampaign', 0);
Step 3: Insert tag into your website’s HTML
Now you’ll need to attach it to the interaction that you’re intending to track. For example, if you have a contact form submit button –
<input type="submit" name="submit" value="Submit" />
You’ll need to utilize the HTML onclick event to send the code to GA. Putting it together, you’ll get –
<input type="submit" name="submit" value="Submit" onclick="ga('send', 'event', 'ContactForm', 'Submit', 'ChristmasCampaign', 0);" />
That’s it! Now whenever the button is clicked, the event will be recorded in Google Analytics.
Step 4: Track event under ‘Behavior’
Under GA’s Behavior > Events, you will have access to the data of the events you are tracking.

What is a Goal?
Goal refer to custom-defined events that are usually worth some monetary value to your business.
For example, in the filling up of input fields in a contact form are also events, but are seldom goals. In contrast, hitting the “submit” button on the same form would usually represent a goal.
Goals are flexible and defined by you. After defining them, GA will allow you to see valuable information about how your customers get to your goal – what other interactions did they make or pages that they visited that led them to accomplishing your goal? Let’s take a look at how you can create them to track your website’s performance.
Creating a Goal
We’ll use a ‘Contact Us’ form as an example for goal creation.
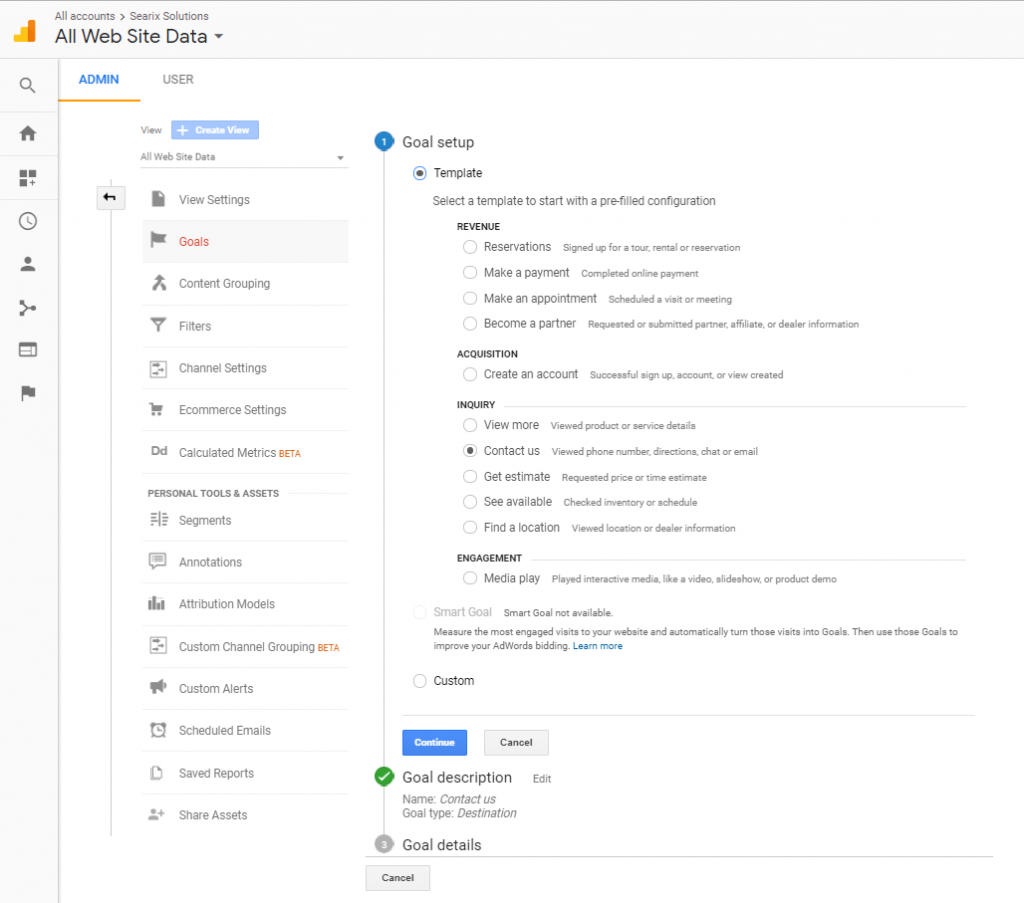
First, click on Admin button on the sidebar, then get to Goals > + New Goal

Step 1: Goal Setup
Choose any of the templates. None of the templates suit your requirements? An option ‘Custom’ is provided.
In this case, we chose the template ‘Contact Us’.

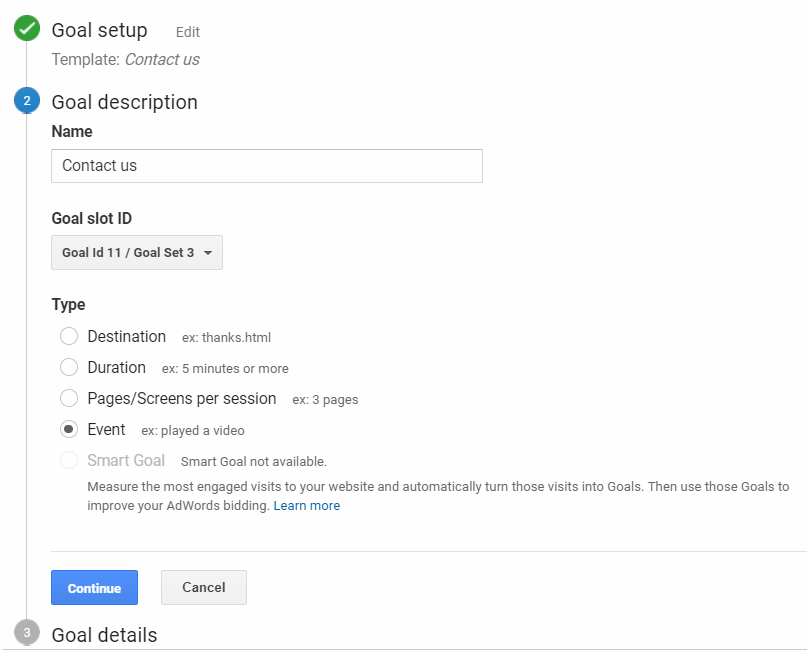
Step 2: Goal Description
After choosing a goal template, we have to name our goal and choose a type, which is “Event” in this case.

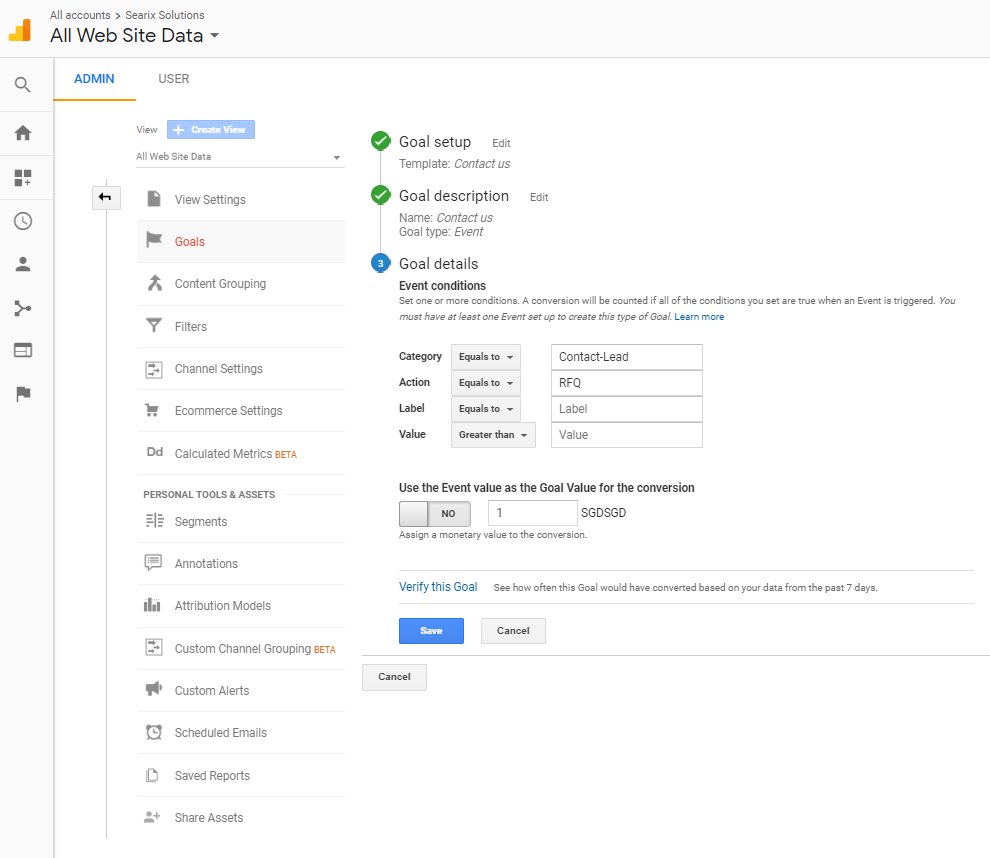
Step 3: Goal Details
The choosing of an “Event” in the previous step will subsequently require you to fill in the event conditions – Category, Action, Label and Value, depending on how you want your event to be defined. Fill these in with what events you send to GA that you want to regard as goals.

And … you are done!
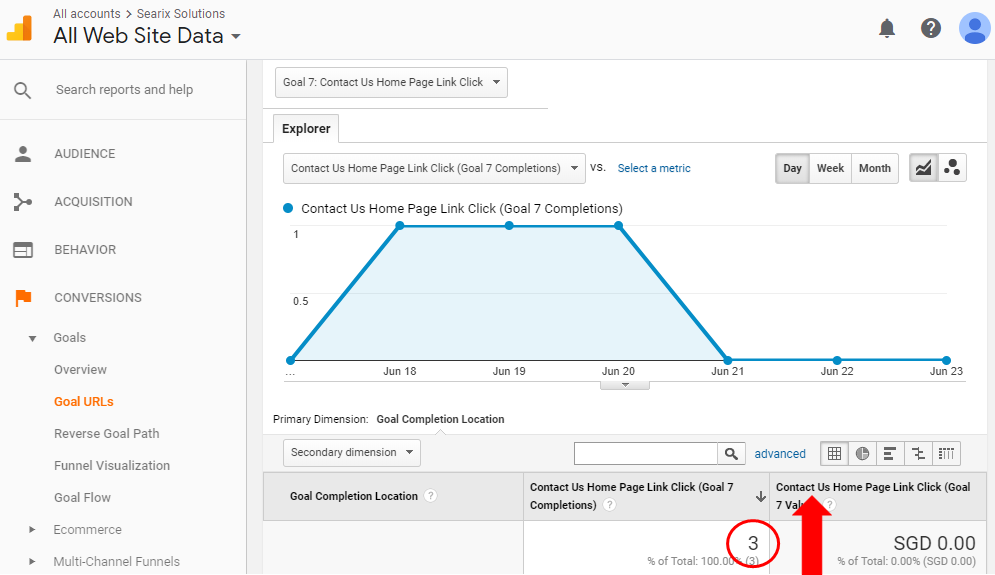
Viewing Goals
You can now visit the “Conversions” tab on GA and access statistics related to your goals.

What’s Next?
Creating an event by writing code is troublesome, and can quickly get messy. Imagine attaching 5 types of tracking tags (e.g. GA Event Tracking, Google Ads Remarketing, Google Ads Conversion, Facebook Pixel, LinkedIn Insight Conversion) to each action. Now imagine 3 – 5 actions that you want to track on each page. Things can easily bloat out of control, and that’s why you should use Google Tag Manager. But we’ll leave that for the next article.